Sunday, 13 May 2007

Twins

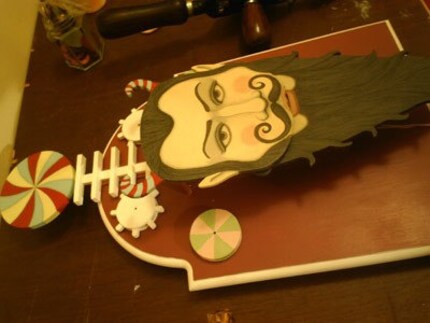
Just finished this painting called 'A cage for two'. I really like moving the hair across multiple plaques, it gives me a really nice feeling. I'm going to carry on messing around with that.

It is for sale in my Etsy Shop.

Saturday, 12 May 2007

Swapsies and a Bee painting

I recently did a swap of a small painting to fit into a frame in return for a frame (in fact I got 2 frames) from MudPuppy on etsy. The frames are pretty small which suits me as I don't usually do anything above a certain size. So I decided to go for a small painting of an insect and in honour of the fact that the Bees all appear to be dying here (yes! why is that?), I did a bee. It looks a bit big in comparison to the frame, so the next one i'm doing will be a bit smaller.

Mind Altering Machine - Progress


Part 1 : The idea, the mechanics and the focal point
I decided recently that when making the next automaton, I would document the process and blog it. This is partly for myself so I can remember where I went right or wrong, and partly for anyone else who might be interested in making an automaton. This is only my 3rd automaton, so I am not an expert, however it might help other beginners learn from my mistakes!


An Idea
The 'Mind Altering' machine started life when I read a MOJO articale on the creation of the Sgt Peppers album. I find the art and design of the era with its mixture of victoriana plus psychedelia really inspiring. The article talked about the influence of psychedlics in the making of the album, and so the 'Mind Altering' machine was born.


I did a fanciful sketch of what a Mind Altering machine might look like and what it might do if it really existed. Naturally, the spirit of John Lennon was crucial to its creation. I know, some people prefer Paul, to be honest I probably prefer George or Ringo, but in the end I chose John because of the love-in and 'Imagine' (John also had a good moustache). The imaginary machine would, when the wheel was turned, produce visions in the person of a better world. The visions drift up from Johns head and inspire the viewer - there are absolutely no nasty side-effects, no visits to mental institutions or ending up wearing a tin-foil anti-telepathy hat. Also John spouts wisdom from a little dispenser in his jacket.


The mechanics
The next thing I did was think about how I could actually turn it into a real machine. As the person turns the wheel at the bottom I needed the 'visions' that arise from John's head to move up and then come back down again. So this meant, I had to turn circular movement into linear reciprocating movement, at this point I consulted Rodney Peppe's book 'Automata and Mechanical Toys' and found the movement I needed.


I should point out that in all 3 automata i've currently made, I have never planned thoroughly in advance, it'd probably save a lot of misery if I did, but I haven't the patience for it, and also it's a bit exciting when you gasp at your own stupidity part-way through and then manage to fix it. Since these are simple machines, it's usually easy to sort out - but you wouldn't want me on the space launch.


Creating the focal point - Transferring & cutting the design
First of all I make the frontispiece (John) and then move on to the mechanics later. I find it is good inspiration to have the main piece completed. So, I decided roughly how big I wanted John to be and then I took the original sketch of the machine and blew it up on the PC. I printed it out across 2 sheets of A4 and taped them together. Then I got a sheet of transfer paper (I use Saral) and taped it to the back of the print out.


I taped the drawing to a piece of wood big enough, traced the outline and then removed the drawing. I use 4mm ply wood for the frontispiece because I only have a hand fret-saw and it's a nightmare to cut anything thicker, also thicker stuff tends to break a lot of blades. I find 4mm is fine for it, but perhaps other people would disagree. Cutting just outside the line is good because then you can sand down to the line and get it all nice and neat. I use a small dremmel for sanding the outside.


Creating the focal point - Painting
First the wood has to be prepared for painting. I sand it until it is quite smooth and then paint it with several thin layers of Acrylic Gesso. I add water to the first layer of gesso (The consistency of single cream) so that it sinks into the wood and grips properly. I Wait for each layer to dry and then I sand it before applying another layer. Eventually I have a fairly smooth white base for painting on.


The next thing I do is a very simple line drawing of the machine and scan it into the computer and digitally colour it. I only do large flat areas of basic colour, I am not interested in details or shadows at this point.


Once i'm happy with the digital colours, I take each colour and match it in paint (I make a large portion of each colour so I don't run out) and store them in glass bottles.


I test out the colours on paper
to make sure they match the digital colours (or at least work well together, the digital image is just a guide). The paints I use are FW acrylic inks. I use these because:

a) I like their consistency - Mixing normal acrylic paint with a medium for consistent - er consistency - can be tedious

b) Because of a. you can dispense the colour with an ink dropper so you have greater accuracy and can record and replicate colours better.


Once all the paint is mixed I then transfer all the outlines for the major colour areas to the wood. I don't need details like the eyes etc, i'm only interested in the base colours.


I build up the colours in thin layers because FW inks, if put on thickly get messy and sometimes crack (especially if there's a lot of white). Putting them on in thin layers means after about 3 layers (making sure each previous layer is dry) you have a crisp flat colour with fine edges and no cracking.


First layer


Final layers


As you can see John has no facial features because these are not areas of colour, they are more gradations of the base skin colours. So I add these details now over the top of the flat colour base.

Because of the issue with trying to pull images down to the bottom and align them properly in Bloggers compose screen i'm splitting this process up. So the next stages will come in the next blog. I hope you ejoy!


Sunday, 22 April 2007

Documenting the build of an automata

I have another idea for an automata which I am part way through building. I aim to document all the steps, partly to help anyone else who might be interested in building automata (I'm no expert but maybe it will be helpful) and also to help myself - looking back on what went wrong/right. I will post it when I finish the automata - or perhaps in stages?

On a different note, Marion Peck's latest exhibition looks brilliant http://www.billyshirefinearts.com/current.html.

Monday, 19 March 2007

Devillish Automaton

Well, the clock now lies in a heap, partially abandoned. I don't mind saying it wasn't the most logical way to build a clock, it came in many layers of card so that you had to glue (up to 21!) layers of card together to make one cog! There are about 15 cogs! However, it did give me an idea so I set about making an automaton, after inspiration from this great book:


I decided to do a really simple mechanism based on the Devillish Sweet and Cake Maker, you pull a cord, his mouth opens (you put a sweetie inside) you let go and his mouth closes. After a few minutes of jumping up and down while you wait, you can now open his mouth again and eat the sweet in the firm knowledge that you deserve it!

Below are the original drawing, in progress shots and the final version.


I'm quite happy with the way it turned out, although the photographs aren't great. I need a new camera really. But anyway, it's for sale in my Etsy shop here.

Saturday, 10 February 2007

Finally - A mechanical device!

So, for a very long time I have loved mechanical things, but haven't the first idea about the realities of mechanics. Last year, a brief and optimistic period was spent trying to make my own wooden gear clock from scratch. This failed spectacularly! Anyway, after that I just made do with drawing pictures of mechanical things (pure fantasy). Then, after drawing the Devillish sweet and Cake Maker I got all irritable because I actually want to build an automaton based on it!

So, then I started looking around at wooden gear clock kits to try and teach myself - and after some searching found a cardboard version!! Yes, cardboard. For a lot of the parts you have to glue layers of card together, but it's a start. Lord knows how far i'll get but hopefully far enough to work out how to build my own mechanisms!

Thursday, 25 January 2007

Paper etc

A quick post about some beautiful paper sites i've come across (through other people's blogs as well!). The first is papersource


And a site whichsells very similar card and envelope products but which does allow a user from GB to sign up is (paper source has some problem with its sign up form which they will hopefully resolve soon) paperpresentation

Along with that is an absolutely stunning source of patterned and specialist papers at papermojo